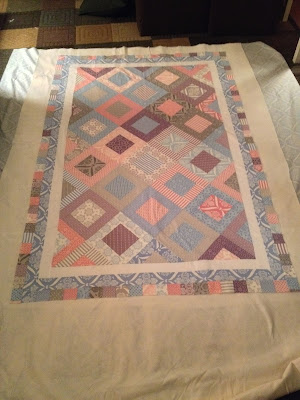
My mother told me several times since she seen my first quilt, that she always wanted to quilt.... little did she know that I was also making one for her!!!
Here it is....
The fabric is from Missouri Star Quilt Co.
and is called Jubilee
I used a Jelly Roll and a Charm Pack.
The pattern is also from MSQC
and the wonderful Jenny!
So easy to do... just frame your charm pack with the jelly roll strips...
I cut two 5" strips and sewed them to opposite sides of the square
Ready to set the seams and press them open
Same thing for the long side...
cut your fabric to 9"
and attach to the remaining sides of the block
see those wonderful blue strips of awesomeness on my machine?? They are called Sewing Edge from QTools and I will never sew another 1/4 seam without them.... they keep your fabric aligned so that you maintain that perfect seam... they are awesome!!!
you can check them out here:
now I am attaching the long strip to the long side...
its always better to sew with your seams side up...
this way you can be sure to sew over them neatly...
How do you like that design wall.. thank you backside of table cloth...
the blocks are accumulating...
but I'm not liking them right now...
So I decided to kick it up a notch
and turn the squares on an angle...
Doesn't that look better???
I just started sewing them together in rows
from left to right....
all the pretty blocks sewn into rows...
and here is where it got a little tricky....
I sewed the rows together...
but as you can see
I had to line them up to make it look right...
but that didn't always work out as planned....
that top block wasn't supposed to be there
break out the seam ripper...
move some blocks around...
and I'm back in business....
the rest of it came together nicely
the rest of it came together nicely
First part of the quilt top is (almost) done!!!
I wasn't sure what I was doing to do with this ... so I just trimmed it even.....
Next came the borders...
I started with a border of white
I really need to figure out how to take better pics... here I added the blue border and started making the pieced border...
I started by sewing my leftover strips together...
Then I trimmed them up and cut them to strips
sewed them all together and pinned them to the quilt top....
Repeat for all the sides and my quilt top is finally completed!!!
Now to make the sandwich..
layer one is the backing fabric
layer two is the batting
layer three is the quilt top.
The backing fabric needed to be sewn together
Look at that seam.. nice job huh?
My quilt is just a little too big for my backing fabric...
I need to trim the border a bit

All better....
My Doubting Thomas friend didn't think this was big enough...
I had to show her it was just fine...
This is my least favorite part of the project
Quilting
I wish I was better at it.
I really do.
This is the pattern I chose
L's all over the quilt
I got out my Mark Be Gone pen and my ruler and starting marking ....
Following the lines...
Lot of work moving this thing around....
All Quilted !!!!
If you look real close you can see the sewn lines...
Last and Least is the binding...
I did not like the results....
Here are a few pics..
:(
When machine binding...
sew the selvage edge of your binding
to the selvage edge of the backing side of your fabric...
when you are done you wrap the binding to the top of the quilt and stitch all the way around...
All done... I didn't take a pic of the binding... I didn't care for the way it came out.. I didn't care anymore... I threw it in the washer and dryer and called it a night.
Here she is...
My second quilt....
Given to my mom for Christmas 2013
I am glad for this to be complete.
It was a lot of work.
My mom loved it...
worth every second ....
Quilt Started on October 28, 2013 and completed on December 21, 2013


.JPG)


No comments:
Post a Comment